Java NIO
之前我们讲过JavaIO,我们曾把JavaIO比喻为从一个竹筒中取水,一滴滴地输入或者输出。新的IO方式使用了不同的方式来处理输入与输出,新IO采用内存映射文件的方式来处理输入和输出,新IO将文件或者文件的一段区域映射到内存中,这样就可以像访问内存一样来访问文件了。
**Channel(通道)和Buffer(缓冲)**是新IO中两个核心对象。新IO系统中所有数据都需要通过通道来传输;你可能会说,都是用通道的话,两者究竟有啥不同?
答案是Channel提供了一个map方法,通过该方法可以直接将一块数据映射到内存中。
使用Buffer
Buffer是一个抽象类,从内部结构上来看,Buffer有点像数组,一类数据的容器。Buffer常用的子类是ByteBuffer,当然也有其他对应基础数据类型的子类。例如CharBuffer、IntBuffer等。
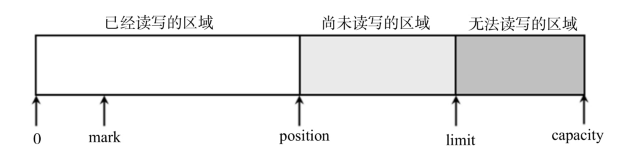
Buffer中有三个重要概念:
- 容量(capacity):缓冲区的容积表示该Buffer最多能容纳多少数据。
- 界限(limit):第一个不能被读出或写入的缓冲区索引,也就是说处于界限之后的数据既不可被读取也不能写入。
- 位置(position):这个很好理解,指明下个能被读出或写入的缓冲区位置索引,类似于IO流中的记录指针,或者RandomAccessFile类的文件指针。(关于前面IO流和RandomAccessFile类我在之前的博客中(将JavaIO那一块都有涉及)
还有一个概念-mark,Buffer允许直接把position直接定位到mark的位置。
常用方法
| 方法 |
描述 |
| static XxxBuffer allocate(int capacity) |
Buffer没有提供构造器,通过使用静态方法可以创建Buffer容器,Xxx代表着基础数据类型。比如Char,Short等。 |
| int capacity() |
返回Buffer容积大小 |
| boolean hasRemaining() |
判断当前位置(position)和界限(limit)之间是否还有元素可供处理 |
| int limit() |
返回Buffer的界限 |
| Buffer limit(int newLt) |
重新设置界限的值,并返回一个具有新界限的缓冲区对象 |
| Buffer mark() |
设置Buffer的mark位置,它只能在0和position之间 |
| int position(int newPs) |
返回buffer的位置 |
| Buffer position() |
设置Buffer的position,并返回新对象 |
| int remaining() |
返回当前位置和界限之间的元素个数 |
| Buffer reset() |
将位置转到mark所在的位置 |
| Buffer rewind() |
将位置设置成0,取消设置的mark |
| put(Object) |
放入数据 |
| Buffer put(Object) |
读取数据 |
| Buffer clean() |
将position设置为0,将limit设置为capacity,也就是说做好了写入数据的准备,当然也可以作为输入数据的准备。 |
| Buffer flip() |
将limit设置为position所在位置,并将position设为0。这就使的Buffer的读写指针回到了开始位置,也就是说做好了输出数据的准备。 |
示例程序
1
2
3
4
5
6
7
8
9
10
11
12
13
14
15
16
17
18
19
20
21
22
23
24
25
26
27
28
29
30
31
32
33
34
35
| import java.nio.Buffer;
import java.nio.CharBuffer;
public class BufferTest {
public static void main(String[] args) {
CharBuffer buff = CharBuffer.allocate(8);
System.out.println("capacity"+buff.capacity());
System.out.println("limit"+buff.limit());
System.out.println("position"+buff.position());
buff.put('a');
buff.put('b');
buff.put('c');
System.out.println("加入3个元素后,position"+buff.position());
buff.flip();
System.out.println("调用flip方法,limit"+buff.limit());
System.out.println("position"+buff.position());
System.out.println("第一个元素(position=0:"+buff.get());
System.out.println("position"+buff.position());
buff.clear();
System.out.println("调用clear()后,limit"+buff.limit());
System.out.println("调用clear()后,position"+buff.position());
System.out.println("执行clear后,缓冲区内容并没有被清除:第三个元素为"+buff.get(2));
System.out.println("执行绝对读取后,position="+buff.position());
}
}
|
通过 allocate() 方法创建的Buffer 对象是普通 Buffer, ByteBuffer 还提供了一个 allocateDirect() 方法来创建直接Buffer。 直接 Buffer 的创建成本比普通 Buffer 的创建成本高, 但直接 Buffer 的读取效率更高。如果只是使用一次就丢弃的话,不建议直接创建Buffer,而且只有ByteBuffer才提供了直接创建Buffer的方法
使用Channel
Channel类似于传统的流对象,不过与传统的流对象主要有两个区别
Channel可以直接将指定文件的部分或全部直接映射成Buffer
程序不能直接访问Channel的数据,包括读写。Channel只能与Buffer进行交互
所有的Channel都不应该通过构造器来创建,而是通过传统的节点的getChannel()方法来创建,所以一般节点流都有与之对应的CHannel。例如FileInputStream()就是返回FileChannel。
方法的话,read和write用法与传统流差不多。提供了一个特殊的map方法。
MappedByteBuffer map(FileChannel.MapMode mode,long position,long size)
第一个参数执行映射的模式(只读、读写等模式);第二个、第三个参数用于控制将Channel的哪些数据映射为ByteBuffer
下面程序示范了直接将FileChannel的全部数据映射成ByteBuffer
1
2
3
4
5
6
7
8
9
10
11
12
13
14
15
16
17
18
19
20
21
22
23
24
25
26
27
28
29
30
31
32
33
34
35
36
37
38
39
40
41
42
43
44
45
46
| import java.io.File;
import java.io.FileInputStream;
import java.io.FileOutputStream;
import java.nio.CharBuffer;
import java.nio.MappedByteBuffer;
import java.nio.channels.FileChannel;
import java.nio.charset.Charset;
import java.nio.charset.CharsetDecoder;
public class FileChannelTest {
public static void main(String[] args) {
File f = new File("FileCHannelTest.java");
try(
FileChannel inChannel = new FileInputStream(f).getChannel();
FileChannel outChannel = new FileOutputStream("a.txt").getChannel();
) {
MappedByteBuffer buffer = inChannel.map(FileChannel.MapMode.READ_ONLY, 0, f.length());
Charset charset = Charset.forName("UTF-8");
outChannel.write(buffer);
buffer.clear();
CharsetDecoder decoder = charset.newDecoder();
CharBuffer charBuffer = decoder.decode(buffer);
System.out.println(charBuffer);
} catch (Exception e) {
e.printStackTrace();
}
}
}
|
注意,虽然FileChannel虽然可以读写,但是FileInputStream获取的FileChannel只能读,而另一个只能写。RandomAccessFile也包含了一个getChannel()的方法,这个方法创建的可读性取决于RandomAccessFile打开文件的模式。
下面是示范程序,将会对a.txt文件的内容进行复制,追加到文件后面
1
2
3
4
5
6
7
8
9
10
11
12
13
14
15
16
17
18
19
20
21
22
23
24
25
26
27
28
29
| import java.io.File;
import java.io.RandomAccessFile;
import java.nio.ByteBuffer;
import java.nio.channels.FileChannel;
public class RandomFileChannelTest {
public static void main(String[] args) {
File f = new File("a.txt");
try(
RandomAccessFile raf = new RandomAccessFile(f, "rw");
FileChannel randomChannel = raf.getChannel()) {
ByteBuffer buffer = randomChannel.map(FileChannel.MapMode.READ_ONLY, 0, f.length());
randomChannel.position(f.length());
randomChannel.write(buffer);
} catch (Exception e) {
e.printStackTrace();
}
}
}
|
字符集和Charset
计算机中的所有文件只是一种表象,所有文件在底层都是二进制文件。对于文本文件来说,我们能看到字符,完全是因为使用了特定的字符集来转换。也就是所谓的编码和解码。

Charset 类提供了一个 availableCharsets() 静态方法来获取当前 JDK 所支持的所有字符集。所以程序可以使用如下程序来获取该 JDK 所支持的全部字符集。
1
2
3
4
5
6
7
8
9
10
11
12
13
14
15
| import java.nio.charset.Charset;
import java.util.SortedMap;
public class CharsetTest {
public static void main(String[] args) {
SortedMap<String, Charset> map = Charset.availableCharsets();
for(String alias : map.keySet()) {
System.out.println(alias+"----->"+map.get(alias));
}
}
}
|
一旦我们知道了字符集的别名之后,就可以调用Charset.forName()方法来创建对应的Charset对象,然后通过该对象的newDecoder()和newEncoder()这两个方法分别返回CharsetDecoder和CharsetEncoder对象,分别代表着Charset的解码器和编码器。
下面程序完成了ByteBuffer和CharBuffer之间的转换
1
2
3
4
5
6
7
8
9
10
11
12
13
14
15
16
17
18
19
20
21
22
23
24
25
26
27
28
29
30
31
32
33
34
35
36
| import java.nio.ByteBuffer;
import java.nio.CharBuffer;
import java.nio.charset.CharacterCodingException;
import java.nio.charset.Charset;
import java.nio.charset.CharsetDecoder;
import java.nio.charset.CharsetEncoder;
public class CharsetTransform {
public static void main(String[] args) throws CharacterCodingException {
Charset cn = Charset.forName("GBK");
CharsetEncoder cnEncoder = cn.newEncoder();
CharsetDecoder cnDecoder = cn.newDecoder();
CharBuffer cbuff = CharBuffer.allocate(8);
cbuff.put('孙');
cbuff.put('悟');
cbuff.put('空');
cbuff.flip();
ByteBuffer bbuff = cnEncoder.encode(cbuff);
for(int i = 0;i<bbuff.capacity();i++) {
System.out.println(bbuff.get(i)+" ");
}
System.out.println("\n"+cnDecoder.decode(bbuff));
}
}
|
如果仅仅需要进行简单的编码、解码操作,直接调用Charset的encode()和decode()方法进行编码、解码即可。
文件锁
NIO中,Java提供了FileLock来支持文件锁定功能,防止在多个运行程序需要并发地修改同一个文件。
lock()上锁,tryLock()可以获得文件锁对象,从而锁定对象。前者会直接上锁,但假如无法得到文件锁,程序将一直阻塞,后者是尝试锁定,如果获得文件锁就返回,没有就返回null。如果想锁定文件地部分内容,则可以使用他们的重载方法。
- lock( long position, long size, boolean shared): 对文件从 position 开始, 长度为 size 的内容 加锁,该方法是阻塞式的。
- tryLock( long position, long size, boolean shared): 非阻塞式的加锁方法。 参数的作用与上一个 方法类似。
下面程序示范了FileLock类
1
2
3
4
5
6
7
8
9
10
11
12
13
14
15
16
17
18
19
20
21
22
23
24
25
| import java.io.FileOutputStream;
import java.nio.channels.FileChannel;
import java.nio.channels.FileLock;
public class FileLockTest {
public static void main(String[] args) {
try(
FileChannel channel = new FileOutputStream("a.txt").getChannel();
)
{
FileLock lock = channel.tryLock();
Thread.sleep(10000);
lock.release();
} catch (Exception e) {
e.printStackTrace();
}
}
}
|
关于文件锁的要点:
- 某些平台上,文件锁仅仅是建议,并不是强制的。这意味着就算上锁还是可以读写。
- 某些平台上,不能同步地锁定一个文件并把它映射到内存中
- 文件锁是Java虚拟机所持有,两个Java程序使用同一个虚拟机,不能对同一个文件上锁。
- 在某些平台上关闭FileChannel时,会释放Java虚拟机在该文件上地所有锁,因此应该避免对同一个被锁定地文件打开多个FileChannel。
NIO.2的功能
Java7对原有的NIO进行了重大改进。提供了全面的文件IO和文件系统访问支持,基于异步Channel的IO
Path、Paths和Files核心API
Path代表了一种与平台无关的平台路径,下面是示例程序
1
2
3
4
5
6
7
8
9
10
11
12
13
14
15
16
17
18
19
20
21
22
23
24
25
26
27
28
| import java.nio.file.Path;
import java.nio.file.Paths;
public class PathTest {
public static void main(String[] args) {
Path path = Paths.get(".");
System.out.println("path里包含的路径数量:"+path.getNameCount());
Path absolutePath = path.toAbsolutePath();
System.out.println(absolutePath);
System.out.println("absolutePath的根路径:"+absolutePath.getRoot());
System.out.println("absolutePath里包含的路径数量:"+absolutePath.getNameCount());
System.out.println(absolutePath.getName(0));
Path path2 = Paths.get("d:","publish","codes");
System.out.println(path2);
}
}
|
Files是一个操作文件的工具类
1
2
3
4
5
6
7
8
9
10
11
12
13
14
15
16
17
18
19
20
21
22
23
24
25
26
27
28
29
30
31
32
33
34
35
36
37
38
39
40
41
42
43
44
45
46
47
48
49
50
| import java.io.FileNotFoundException;
import java.io.FileOutputStream;
import java.io.IOException;
import java.nio.charset.Charset;
import java.nio.file.FileStore;
import java.nio.file.Files;
import java.nio.file.Path;
import java.nio.file.Paths;
import java.util.ArrayList;
import java.util.List;
public class FilesTest {
public static void main(String[] args) throws FileNotFoundException, IOException {
Path path = Paths.get("FilesTest.java");
Charset forName = Charset.forName("UTF-8");
Files.copy(path, new FileOutputStream("a.txt"));
System.out.println("FileTest.java是否为隐藏文件"+Files.isHidden(path));
List<String> lines = Files.readAllLines(path,forName);
System.out.println(lines);
System.out.println("FilesTest.java的大小为:"+
Files.size(path));
List<String> poem = new ArrayList<>();
poem.add("水晶谭底银鱼跃");
poem.add("清徐风中碧杆横");
Files.write(Paths.get("poem.txt"), poem, forName);
Files.list(Paths.get(".")).forEach(path1 ->System.out.println(path1));
Files.lines(path,forName).forEach(line -> System.out.println(line));
FileStore cStore = Files.getFileStore(Paths.get("C:"));
System.out.println("C:共有空间:"+cStore.getTotalSpace());
System.out.println("C:可有空间:"+cStore.getUsableSpace());
}
}
|
使用FileVisitor遍历文件和目录
| 方法 |
描述 |
| walkFileTree( Path start, FileVisitor<? super Path> visitor) |
遍历 start 路径下的所有文件和子目录。 |
| walkFileTree( Path start, Set< FileVisitOption> options, int maxDepth, FileVisitor<? super Path> visitor) |
与上一个方法类似,该方法最多遍历maxDepth深度的文件 |
| FileVisitResult postVisitDirectory( T dir, IOException exc) |
访问子目录之后触发该方法。 |
| FileVisitResult preVisitDirectory( T dir, BasicFileAttributes attrs) |
访问子目录之前触发该方法。 |
| FileVisitResult visitFile( T file, BasicFileAttributes attrs) |
访问 file 文件时触发该方法。 |
| FileVisitResult visitFileFailed( T file, IOException exc) |
访问 file 文件失败时触发该方法。 |
上面方法返回的FileVisitResult 对象是一个枚举类,代表了访问之后的后续行为:
- CONTINUE: 代表“ 继续访问” 的后续行为。
- SKIP_ SIBLINGS: 代表“ 继续访问” 的后续行为,但不访问该文件或目录的兄弟文件或目录。
- SKIP_ SUBTREE: 代表“ 继续访问” 的后续行为,但不访问该文件或目录的子目录树
- TERMINATE: 代表“ 中止访问” 的后续行为。
实际使用的时候没必要4个方法都实现
1
2
3
4
5
6
7
8
9
10
11
12
13
14
15
16
17
18
19
20
21
22
23
24
25
26
27
28
29
30
31
32
33
34
35
36
| import java.io.IOException;
import java.nio.file.FileVisitResult;
import java.nio.file.Files;
import java.nio.file.Path;
import java.nio.file.Paths;
import java.nio.file.SimpleFileVisitor;
import java.nio.file.attribute.BasicFileAttributes;
public class FileVisitorTest {
public static void main(String[] args) throws IOException {
Files.walkFileTree(Paths.get("D:","java_project","test"), new SimpleFileVisitor<Path>() {
@Override
public FileVisitResult visitFile(Path file,BasicFileAttributes attrs) {
System.out.println("正在访问"+file+"文件");
if(file.endsWith("FileVisitorTest.java")) {
System.out.println("--已经找到目标文件--");
return FileVisitResult.TERMINATE;
}
return FileVisitResult.CONTINUE;
}
@Override
public FileVisitResult preVisitDirectory(Path dir,BasicFileAttributes attrs) {
System.out.println("正在访问:"+dir+"路径");
return FileVisitResult.CONTINUE;
}
});
}
}
|
使用WatchService监控文件变化
Path类提供了register方法来监听文件系统的变化
register( WatchService watcher, WatchEvent. Kind<?>... events)
用 watcher 监听该 path 代表的目录下的文件变化。 events 参数指定要监听哪些类型的事件。
通过注册以后就可以通过WatchSrvice代表一个文件系统监听服务。
- WatchKey poll(): 获取 下一个 WatchKey, 如果 没有 WatchKey 发生 就 立即 返回 null。
- WatchKey poll( long timeout, TimeUnit unit): 尝试等待 timeout 时间去获取下一个 WatchKey。
- WatchKey take(): 获取下一个 WatchKey, 如果没有 WatchKey 发生就一直等待。
如果程序需要一直监控,则应该选择使用 take() 方法; 如果程序只需要监控指定时间,则可考虑使用 poll() 方法。
如下程序监听了C盘创建文件,修改文件,删除文件的操作
1
2
3
4
5
6
7
8
9
10
11
12
13
14
15
16
17
18
19
20
21
22
23
24
25
26
27
28
29
30
31
32
33
34
35
36
| import java.io.IOException;
import java.nio.file.FileSystems;
import java.nio.file.Paths;
import java.nio.file.StandardWatchEventKinds;
import java.nio.file.WatchEvent;
import java.nio.file.WatchKey;
import java.nio.file.WatchService;
public class WatchServiceTest {
public static void main(String[] args) throws IOException, InterruptedException {
WatchService watchService = FileSystems.getDefault().newWatchService();
Paths.get("C:/").register(watchService,
StandardWatchEventKinds.ENTRY_CREATE,
StandardWatchEventKinds.ENTRY_MODIFY,
StandardWatchEventKinds.ENTRY_DELETE);
while(true) {
WatchKey key = watchService.take();
for(WatchEvent<?> event : key.pollEvents()) {
System.out.println(event.context()+" 文件发生了"+event.kind()+" 事件!");
}
boolean valid = key.reset();
if(!valid) {
break;
}
}
}
}
|
访问文件属性
Java7的NIO.2在java.nio.file.attribute包下提供了大量的工具类。这些工具类主要分为以下两类
- XxxAttributeView: 代表某种文件属性的“ 视图”。
- XxxAttributes: 代表某种文件属性的“ 集合”,程序一般通过 XxxAttributeView 对象来获取 XxxAttributes。
下面是一些方法的官方记录:
| 方法 |
描述 |
| AclFileAttributeView |
通过 AclFileAttributeView,开发者可以为特定文件设置ACL( Access Control List)及文件所有者属性。它的 getAcl() 方法返回 List< AclEntry> 对象,该返回值代表了该文件的权限集。通过 setAcl( List)方法可以修改该文件的 ACL。 |
| BasicFileAttributeView |
它可以获取或修改文件的基本属性,包括文件的最后修改时间、最后访问时间、创建时间、大小、是否为目录、是否为符号链接等。它的 readAttributes() 方法返回一个 BasicFileAttributes 对象,对文件夹基本属性的修改是通过 BasicFileAttributes 对象完成的。 |
| DosFileAttributeView |
它主要用于获取或修改文件 DOS 相关属性,比如文件是否只读、是否隐藏、是否为系统文件、是否是存档文件等。 它的 readAttributes() 方法返回一个 DosFileAttributes 对象,对这些属性的修改其实是由 DosFileAttributes 对象来完成的。 |
| FileOwnerAttributeView |
它主要 用于获取或修改文件的所有者。 它的 getOwner() 方法返回一个 UserPrincipal 对象来 代表文件所有者;也可调用 setOwner( UserPrincipal owner)方法来改变文件的所有者。 |
| PosixFileAttributeView |
它主要用于获取或修改 POSIX( Portable Operating System Interface of INIX)属性,它的 readAttributes() 方法返回一个PosixFileAttributes 对象,该对象可用于获取或修改文件的所有者、组所有者、访问权限信息( 就是 UNIX 的 chmod 命令负责干的事情)。这个 View 只在 UNIX、 Linux 等系统上有用。 |
示例程序
1
2
3
4
5
6
7
8
9
10
11
12
13
14
15
16
17
18
19
20
21
22
23
24
25
26
27
28
29
30
31
32
33
34
35
36
37
38
39
40
41
42
43
44
45
46
47
48
49
50
51
52
53
54
55
56
57
58
59
60
61
62
63
64
65
66
67
68
69
70
71
| import java.io.IOException;
import java.nio.ByteBuffer;
import java.nio.charset.Charset;
import java.nio.file.FileSystems;
import java.nio.file.Files;
import java.nio.file.Path;
import java.nio.file.Paths;
import java.nio.file.attribute.BasicFileAttributeView;
import java.nio.file.attribute.BasicFileAttributes;
import java.nio.file.attribute.DosFileAttributeView;
import java.nio.file.attribute.FileOwnerAttributeView;
import java.nio.file.attribute.UserDefinedFileAttributeView;
import java.nio.file.attribute.UserPrincipal;
import java.util.Date;
import java.util.List;
public class AttributeViewTest {
public static void main(String[] args) throws IOException {
Path testPath = Paths.get("AttributeViewTest.java");
BasicFileAttributeView basicView = Files.getFileAttributeView(testPath, BasicFileAttributeView.class);
BasicFileAttributes basicAttribs = basicView.readAttributes();
System.out.println("创建时间:"+new Date(basicAttribs.creationTime().toMillis()));
System.out.println("最后访问时间:"+new Date(basicAttribs.lastAccessTime().toMillis()));
System.out.println("最后修改时间:"+new Date(basicAttribs.lastModifiedTime().toMillis()));
System.out.println("文件大小:"+basicAttribs.size());
FileOwnerAttributeView ownerView = Files.getFileAttributeView(testPath, FileOwnerAttributeView.class);
System.out.println(ownerView.getOwner());
UserPrincipal user = FileSystems.getDefault().getUserPrincipalLookupService().lookupPrincipalByName("guest");
UserDefinedFileAttributeView userView = Files.getFileAttributeView(testPath, UserDefinedFileAttributeView.class);
List<String> attrNames = userView.list();
for(String name: attrNames) {
ByteBuffer buf = ByteBuffer.allocate(userView.size(name));
userView.read(name, buf);
buf.flip();
String value = Charset.defaultCharset().decode(buf).toString();
System.out.println(name+"--->"+value);
}
userView.write("发行者", Charset.defaultCharset().encode("疯狂Java联盟"));
DosFileAttributeView dosView = Files.getFileAttributeView(testPath, DosFileAttributeView.class);
dosView.setHidden(true);
dosView.setReadOnly(true);
}
}
|
NIO很强很强,猛得一批。